Next: 6.5 Summary Up: 6. CFD simulations Previous: 6.3 Results of wind Contents
Results of rain simulations are presented and discussed in the same
order as the calculations, i.e. firstly catch ratios ![]() on the
west façade of the Main Building and, secondly, driving rain amounts
on the façade. Finally, the driving rain simulations are compared
with driving rain measurements.
on the
west façade of the Main Building and, secondly, driving rain amounts
on the façade. Finally, the driving rain simulations are compared
with driving rain measurements.
Catch ratios ![]() Figure 6.10 shows simulated catch ratios
Figure 6.10 shows simulated catch ratios
![]() on the west façade of the Main Building for
on the west façade of the Main Building for
![]() m s
m s![]() and wind from the west. The calculations included turbulent
dispersion of drops. From the figure one can observe that, for a given
drop diameter, the upper part of the façade has higher catch ratios
than the lower part. This applies also for the sides of the west façade
in comparison to the middle part. Besides, the catch ratio on a façade
section increases with drop diameter (figure
6.10) and with wind speed (cf. figures
6.10 and 6.12).
and wind from the west. The calculations included turbulent
dispersion of drops. From the figure one can observe that, for a given
drop diameter, the upper part of the façade has higher catch ratios
than the lower part. This applies also for the sides of the west façade
in comparison to the middle part. Besides, the catch ratio on a façade
section increases with drop diameter (figure
6.10) and with wind speed (cf. figures
6.10 and 6.12).
When the turbulent drop dispersion is not included in the calculations,
the results are as shown in figure 6.11.
Compared to the calculations with dispersion, these results show lower
values of ![]() . The relative differences are larger for smaller
. The relative differences are larger for smaller
![]() . It seems that drops more easily hit the façade when
turbulent dispersion is included in the calculations. Turbulence can be seen
as an extra mechanism which drives drops out of their `mean paths'
which are determined by the mean wind velocity and the drop's inertia.
However, the calculation of the turbulent drop dispersion in
the
. It seems that drops more easily hit the façade when
turbulent dispersion is included in the calculations. Turbulence can be seen
as an extra mechanism which drives drops out of their `mean paths'
which are determined by the mean wind velocity and the drop's inertia.
However, the calculation of the turbulent drop dispersion in
the ![]() -
-![]() model assumes isotropic turbulence, which is not
realistic near surfaces. This means that the simulated turbulent
velocity component perpendicular to the façade might be too large and
the lateral turbulent component too small. Because of their smaller
inertia, larger drops are less sensitive to turbulence than smaller
drops, and therefore the difference in
model assumes isotropic turbulence, which is not
realistic near surfaces. This means that the simulated turbulent
velocity component perpendicular to the façade might be too large and
the lateral turbulent component too small. Because of their smaller
inertia, larger drops are less sensitive to turbulence than smaller
drops, and therefore the difference in ![]() of larger drops with and
without turbulent dispersion is smaller.
of larger drops with and
without turbulent dispersion is smaller.
Exemplary drop trajectories in figure 6.3 also illustrate the differences between smaller and larger drops, and between calculations with and without turbulent drop dispersion.
![% label\{e:eta:facade:3.5:270\}
\small
%%% x-axis [cc][b]
% psfrag\{Sh\}[cc][...
...rib/eta-GG-legenda-hgtx-061-00-Kd.eps} % was width=0.9 linewidth
\end{center}](img510.gif)
|
![% label\{e:eta(D):facade:3.5:270\}
\small
%%% x-axis [cc][b]
\psfrag{D} [cc]...
...matlabhoogte]{h-simulations/Rfdistrib/D-eta-hgtx-061-00-Kd-3.eps}
\end{tabbing}](img513.gif)
|
The simulated catch ratios ![]() at several façade sections as
a function of drop diameter are depicted in figures
6.13 (with drop dispersion) and
6.14 (without drop dispersion). In
figures 6.13a and
6.14a, solid lines refer to façade
sections A1, B1, etc. to E1, whereas the dashed lines refer to
façade sections A18, B18, etc. to E18, which are their symmetric
counterparts. Figures 6.13b and
6.14b present the results of
façade sections A7 to E7 and A12 to E12, respectively. By showing
the symmetrical counterparts of the façade sections in one figure,
we can see the variations in
at several façade sections as
a function of drop diameter are depicted in figures
6.13 (with drop dispersion) and
6.14 (without drop dispersion). In
figures 6.13a and
6.14a, solid lines refer to façade
sections A1, B1, etc. to E1, whereas the dashed lines refer to
façade sections A18, B18, etc. to E18, which are their symmetric
counterparts. Figures 6.13b and
6.14b present the results of
façade sections A7 to E7 and A12 to E12, respectively. By showing
the symmetrical counterparts of the façade sections in one figure,
we can see the variations in ![]() at symmetrical façade
sections. These variations are larger when a façade section is
located more to the edges, and can be explained by the higher degree
of turbulence at the edges of the building, and by computational
errors in the wind and drop trajectory simulations.
at symmetrical façade
sections. These variations are larger when a façade section is
located more to the edges, and can be explained by the higher degree
of turbulence at the edges of the building, and by computational
errors in the wind and drop trajectory simulations.
Comparing the results of the calculations with and without turbulent
drop dispersion, one can see that especially drops of smaller sizes do
not hit the façade on the lower façade sections at all when
drop dispersion is not included. Moreover, ![]() is generally
lower without drop dispersion than with drop dispersion.
is generally
lower without drop dispersion than with drop dispersion.
![\begin{center}%
%%% x-axis [cc][b]
\psfrag{D} [cc][b]{\small$D$ [mm]}
%%% y...
...ht=\matlabhoogte]{h-simulations/Rfdistrib/keuzefih-wessels.eps}
\end{center}](img515.gif) |
![% label\{e:k:facade:3.5:270:wessels:0.88\}
\small
\psfrag{T}{$k=$}
\par
\beg...
...linewidth]{h-simulations/Rfdistrib/k-GG-leg-hgtx-061-00-Kd.eps}\\
\end{center}](img516.gif)
|
Driving rain ratio ![]() The chosen raindrop spectra for the calculation of driving rain ratios
(
The chosen raindrop spectra for the calculation of driving rain ratios
(
![]() ) are depicted in figure
6.15. As mentioned in section
6.2, the parameterisation of
[Wessels 1972] is used. Figures
6.16 to
6.19 show the driving rain
ratios
) are depicted in figure
6.15. As mentioned in section
6.2, the parameterisation of
[Wessels 1972] is used. Figures
6.16 to
6.19 show the driving rain
ratios ![]() for the various façade sections and the two values of
for the various façade sections and the two values of
![]() . As one can expect from the above observations on
. As one can expect from the above observations on ![]() , the
driving rain ratio is higher at the upper and side edges of the
building, and for rain spectra with relatively more larger drops.
Moreover, the differences in
, the
driving rain ratio is higher at the upper and side edges of the
building, and for rain spectra with relatively more larger drops.
Moreover, the differences in ![]() resulting from the inclusion of
turbulent dispersion are also apparent in
resulting from the inclusion of
turbulent dispersion are also apparent in ![]() .
.
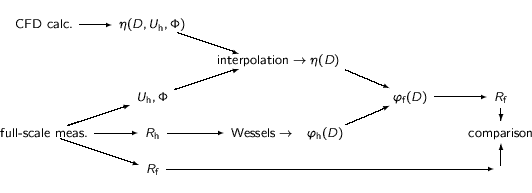 |
Comparison with measured driving rain intensities
A scheme of the driving rain intensity calculations is presented in
figure 6.20. Using the
[Wessels 1972] parameterisations, the raindrop mass flux spectra
(
![]() ) are calculated from the horizontal rain
intensity obtained from the full-scale measurements. Catch ratios
(
) are calculated from the horizontal rain
intensity obtained from the full-scale measurements. Catch ratios
(![]() ) for a particular façade section, reference wind speed
and direction are obtained by interpolation of the catch ratios
obtained by the raindrop trajectory (CFD) calculations. As these
calculations were not performed for every possible reference wind
speed and direction, we can only calculate
) for a particular façade section, reference wind speed
and direction are obtained by interpolation of the catch ratios
obtained by the raindrop trajectory (CFD) calculations. As these
calculations were not performed for every possible reference wind
speed and direction, we can only calculate ![]() and,
subsequently,
and,
subsequently,
![]() for limited ranges of wind
speeds and directions. (The actually performed CFD calculations
are listed in table 6.2.) The results presented below
are obtained by the method described in this paragraph and depicted in
figure 6.20.
for limited ranges of wind
speeds and directions. (The actually performed CFD calculations
are listed in table 6.2.) The results presented below
are obtained by the method described in this paragraph and depicted in
figure 6.20.
The plots in figure 6.21 show measured and
simulated driving rain intensities at position P4/5 as a function
of horizontal rain intensity. The full-scale measurement data in
figure 6.21a result from selection for ![]() 270
270![]()
![]() 15
15![]() and
and ![]() 4-5 m s
4-5 m s![]() , while the
simulated data were obtained from calculations with turbulent drop
dispersion. The simulated data show that different raindrop
spectrum parameters result in different driving rain intensities for a
given horizontal rain intensity, wind speed, wind direction and façade
position. Moreover, a given spectrum parameterisation yields an
almost linear relation between horizontal and driving rain
intensities. This relation can be expressed by the following
formula:
, while the
simulated data were obtained from calculations with turbulent drop
dispersion. The simulated data show that different raindrop
spectrum parameters result in different driving rain intensities for a
given horizontal rain intensity, wind speed, wind direction and façade
position. Moreover, a given spectrum parameterisation yields an
almost linear relation between horizontal and driving rain
intensities. This relation can be expressed by the following
formula:
![% label\{f:Rh-Rf-meas-est-P45\}
\small
%%% x-axis [cc][b]
\psfrag{Rh P2} [cc...
...ns/vergelijk/Rh-RfP45-Rfest-c5_971201_991130_12_m_7_8_270_15.eps}
\end{tabbing}](img524.gif)
|
Figure 6.21a and equation 6.10 show
that the driving rain ratio (![]() ) for given façade position, wind
speed and wind direction is a function of parameter
) for given façade position, wind
speed and wind direction is a function of parameter ![]() , which
determines the shape of the raindrop spectrum. In other words,
raindrop spectra with the same horizontal rain intensity but with
different shapes yield different driving rain intensities. The
measured data are very scattered and differ often much from the
simulated data. Of course, the real raindrop spectra are unknown, and
hence could not be used in the calculations. We know that it is very
likely that measured raindrop spectra differ much from relations like
those given by [Best 1950] (see section
5.2.9). Hence, we cannot yet conclude whether the
relation of equation 6.10 corresponds to reality.
Moreover, it is possible that the simulated catch ratio
, which
determines the shape of the raindrop spectrum. In other words,
raindrop spectra with the same horizontal rain intensity but with
different shapes yield different driving rain intensities. The
measured data are very scattered and differ often much from the
simulated data. Of course, the real raindrop spectra are unknown, and
hence could not be used in the calculations. We know that it is very
likely that measured raindrop spectra differ much from relations like
those given by [Best 1950] (see section
5.2.9). Hence, we cannot yet conclude whether the
relation of equation 6.10 corresponds to reality.
Moreover, it is possible that the simulated catch ratio ![]() do
not correspond to the actual situation because of errors in the
simulation of wind speeds and raindrop trajectories. Other causes for
the scatter may be, for instance, the applied clock period, the
temporal evolution of rain events, and the neglect of raindrop
coagulation in the model. At the end of this section we will show
results of driving rain intensities calculated directly from measured
raindrop spectra.
do
not correspond to the actual situation because of errors in the
simulation of wind speeds and raindrop trajectories. Other causes for
the scatter may be, for instance, the applied clock period, the
temporal evolution of rain events, and the neglect of raindrop
coagulation in the model. At the end of this section we will show
results of driving rain intensities calculated directly from measured
raindrop spectra.
The simulation shown in figure 6.21b differs
only from the one in figure 6.21a by the fact
that no turbulent drop dispersion is used. The difference between the
two simulation results in figure 6.21b, i.e.
corresponding to the two parameterisations of the raindrop spectra, is
now much larger. Thus, without turbulent drop dispersion, the
influence of differences in drop spectra (i.e. in ![]() ) has a larger
effect than with turbulent drop dispersion. This is explained by
differences in the catch ratios
) has a larger
effect than with turbulent drop dispersion. This is explained by
differences in the catch ratios ![]() (e.g. figure
6.13 and 6.14
respectively). Small drops have a smaller tendency to fall onto the
façade in calculations without turbulent drop dispersion, and
therefore the ratio between the number of smaller and bigger drops,
which is quite large in the chosen raindrop spectrum parameterisations
(see figure 6.15), results in larger differences
in the simulated driving rain intensities.
(e.g. figure
6.13 and 6.14
respectively). Small drops have a smaller tendency to fall onto the
façade in calculations without turbulent drop dispersion, and
therefore the ratio between the number of smaller and bigger drops,
which is quite large in the chosen raindrop spectrum parameterisations
(see figure 6.15), results in larger differences
in the simulated driving rain intensities.
The simulation shown in figure 6.21c differs
only from the one in figure 6.21b by the
reference wind speed, namely 7-8 m s![]() . As expected, higher wind
speeds result in higher driving rain intensities. Comparing the
results of the measurements with the results of the simulations
presented in figures 6.21a-c, we see that many
measurements fall outside the region enclosed by the simulated data
which represent 90% of all drop spectra in the Netherlands
according to [Wessels 1972]. The simulation may even
systematically overestimate (figure 6.21a) or
underestimate (figure 6.21c) the measurements by
a factor of 2.
. As expected, higher wind
speeds result in higher driving rain intensities. Comparing the
results of the measurements with the results of the simulations
presented in figures 6.21a-c, we see that many
measurements fall outside the region enclosed by the simulated data
which represent 90% of all drop spectra in the Netherlands
according to [Wessels 1972]. The simulation may even
systematically overestimate (figure 6.21a) or
underestimate (figure 6.21c) the measurements by
a factor of 2.
Figure 6.22 shows the results for position P6 in the same way as figure 6.21 for position P4/5. More or less the same conclusions as given above hold position P6.
![% label\{f:RfP45-RfP6-meas-est\}
\small
%%% x-axis [cc][b]
\psfrag{RfP45} [c...
...\
% ruit\{\} = Wessels' spectra with $A=1.77$\
% end\{tabular\}
\end{tabbing}](img526.gif)
|
The results of simulations without and with turbulent drop dispersion for a given position, wind speed and wind direction can be compared by comparing figure 6.21a with figure 6.21b, and figure 6.22a with figure 6.22b. The figures show that the simulations with turbulent drop dispersion result in higher driving rain intensities than those without turbulent drop dispersion. If one projects all results presented in the figures 6.21a and b (and in the figures 6.22a and b respectively) into one figure, many measured data fall within the region comprised by the simulated data. As we also have seen before, a simulation with turbulent drop dispersion yields larger driving rain intensities than without turbulent drop dispersion. Due to the fluctuating velocity components, more drops impinge on the façade than in simulations without turbulent drop dispersion, and hence the driving rain intensity is higher. Moreover, the trajectory model with the turbulent drop dispersion may likely overestimate the number of drops on the façade because it is based on isotropic turbulence, and therefore on too high estimates of fluctuating velocity components perpendicular to the façade. Comparing the simulations with the measurements, it seems indeed that the two raindrop trajectory models yield an upper and lower limit.
Comparison between P4/5 and P6
A correlation of the measured and simulated driving rain intensities
at positions P4/5 and with those at P6 is plotted in figure
6.23. Figure 6.23a
corresponds to figures 6.21a &
6.22a and, likewise, figure
6.23b with 6.21b &
6.22b and figure 6.23c
with 6.21c & 6.22c. As
we have observed that the relation between horizontal rain intensity
and simulated driving rain intensity is almost linear (eq.
6.10 and figs. 6.21 and
6.22), it is obvious that the simulated data in
figure 6.23 form a straight line too. The
ratio between the simulated driving rain intensities at P4/5 and
P6 is therefore almost independent of raindrop spectrum
parameterisation. The measured data are, however, very much
scattered. The measured ratios
![]() (compare also with table
5.4b) are generally larger than the simulated ratios.
Here again, it is difficult to trace back where inaccuracies were
introduced in the simulations.
(compare also with table
5.4b) are generally larger than the simulated ratios.
Here again, it is difficult to trace back where inaccuracies were
introduced in the simulations.
![% label\{f:RfP45-RfP6-meas-est\}
\small
%%% x-axis [cc][b]
\psfrag{Rh} [cc][...
...lijk/Rh-RfP6-Rfest-c5_991001_000131_12_m_35_112_270_15.eps}
\\
\end{tabbing}](img527.gif)
|
Measured raindrop spectra Figure 6.24 shows
the results of driving rain intensities calculated from our measured
raindrop spectra. The disdrometer was only operational during a short
period (1-10-1999 to 7-1-2000). Therefore the range of the selected
wind speeds was extended to 3.5-11.2 m s![]() to obtain enough data.
The data indicated by
to obtain enough data.
The data indicated by
![]() and
and
![]() represent the
calculations based on Wessels' spectra with
represent the
calculations based on Wessels' spectra with ![]() and
and ![]() ,
respectively, and with horizontal rain intensities measured by the
disdrometer (
,
respectively, and with horizontal rain intensities measured by the
disdrometer (
![]() ). The calculations indicated by
). The calculations indicated by
![]() are based directly on the measured raindrop spectra
(
are based directly on the measured raindrop spectra
(
![]() ), so not totally similar to figure
6.20. Important to note is that the
simulation results based on the measured raindrop spectra
(
), so not totally similar to figure
6.20. Important to note is that the
simulation results based on the measured raindrop spectra
(
![]() ) show much more scatter than the other simulation
results (
) show much more scatter than the other simulation
results (
![]() and
and
![]() ). The measured driving rain
intensities are indicated by
). The measured driving rain
intensities are indicated by
![]() . The figure shows that the
simulated driving rain intensities differ from the measured driving
rain intensities. However, in the case of position P4/5 the
simulations based on the measured raindrop spectra and those based on
the Wessels' parameterisation with
. The figure shows that the
simulated driving rain intensities differ from the measured driving
rain intensities. However, in the case of position P4/5 the
simulations based on the measured raindrop spectra and those based on
the Wessels' parameterisation with ![]() are quite close to the
measurements. In the case of position P6 almost all simulated
data are lower than the measured driving rain data. Although the
number of measurements with the disdrometer is small, we intend to
conclude that the best parameterisation of the raindrop spectrum by
Wessels is the one with
are quite close to the
measurements. In the case of position P6 almost all simulated
data are lower than the measured driving rain data. Although the
number of measurements with the disdrometer is small, we intend to
conclude that the best parameterisation of the raindrop spectrum by
Wessels is the one with ![]() .
.
© 2002 Fabien J.R. van Mook
![% label\{e:eta:facade:nodisp:3.5:270\}
\small
%%% x-axis [cc][b]
% psfrag\{Sh...
...dth]{h-simulations/Rfdistrib/eta-GG-legenda-hgtx-061-00-Km.eps}\\
\end{center}](img511.gif)
![% label\{e:eta:facade:5.7:270\}
\small
%%% x-axis [cc][b]
% psfrag\{Sh\}[cc][...
...dth]{h-simulations/Rfdistrib/eta-GG-legenda-hgtx-100-00-Kd.eps}\\
\end{center}](img512.gif)
![% label\{e:eta(D):facade:nodisp:3.5:270\}
\small
%%% x-axis [cc][b]
\psfrag{...
...matlabhoogte]{h-simulations/Rfdistrib/D-eta-hgtx-061-00-Km-3.eps}
\end{tabbing}](img514.gif)
![% label\{e:k:facade:nodisp:3.5:270:wessels:0.88\}
\small
\psfrag{T}{$k=$}
\p...
...linewidth]{h-simulations/Rfdistrib/k-GG-leg-hgtx-061-00-Km.eps}\\
\end{center}](img517.gif)
![% label\{e:k:facade:3.5:270:wessels:1.77\}
\small
\psfrag{T}{$k=$}
\par
\beg...
...linewidth]{h-simulations/Rfdistrib/k-GG-leg-hgtx-061-00-Kd.eps}\\
\end{center}](img518.gif)
![% label\{e:k:facade:nodisp:3.5:270:wessels:1.77\}
\small
\psfrag{T}{$k=$}
\p...
...linewidth]{h-simulations/Rfdistrib/k-GG-leg-hgtx-061-00-Km.eps}\\
\end{center}](img519.gif)
![% label\{f:Rh-Rf-meas-est-P6\}
\small
%%% x-axis [cc][b]
\psfrag{Rh P2} [cc]...
...ons/vergelijk/Rh-RfP6-Rfest-c5_971201_991130_12_m_7_8_270_15.eps}
\end{tabbing}](img525.gif)